



A Seven-Day Plan to Learn Useful Language for Travel

Full disclosure: This post contains affiliate links. ?
True story: on a trip to France I walked into a hair salon because I had mistaken a word related to coiffure for something related to coffee.
A salon de coiffure is a hair salon, not a coffee shop.
Boy did I feel silly. And a little guilty about my lack of French skills.
Have you ever felt bad when travelling because of your lack of language skills?
You know the feeling: you arrive somewhere new and realise you cannot yet use a few essential phrases in a local language.
You may have planned to learn a little before the flight, then run out of time and hoped that English would cover every interaction.
Feeling guilty isn’t the only problem. It’s really tricky to get around in a new country if you can’t communicate or read signs.
A focused week will not remove every communication problem, but it can help you prepare for a small set of predictable situations.
This seven-day plan helps you learn and practise useful travel phrases. It does not promise fluency; the aim is to handle a few high-priority interactions more confidently and know how to ask for help when you do not understand.
A note from the Fluent in 3 Months team before we get started: You can chat away with a native speaker for at least 15 minutes with the “Fluent in 3 Months” method. All it takes is 90 days. Tap this link to find out more.
What is Travel Fluent?
I use “travel fluent” here as a convenient label for being able to get through a limited set of travel situations. It is not general fluency or a claim that your speech will be easy and accurate after one week.
Let’s say you’re going on a weekend trip to Paris. You’re going to be in a few different situations where you may need to be able to communicate in French:
- Getting from the airport to your hotel
- Checking in to your hotel
- Ordering in a restaurant
- Getting directions to a museum
- Asking how much an item costs in a supermarket
Those situations will be completely different on each trip you take, too. A hiking trip in Slovenia will need much more specific phrases, such as asking for help finding the right trail, compared to a romantic weekend in Paris.
The practical aim is to combine a few prepared phrases with listening, gestures and clarification. That can make common travel interactions less daunting without pretending that every exchange will follow a script.
You will by no means speak perfectly. Some people may answer in English. When they answer in the language you are learning, you may recognise only a few keywords rather than complete sentences.
But being able to make the effort in a new country, and take comfort in the fact that you can communicate when you have to, is a brilliant start.
It is also a practical place to begin interacting with people and learning the basics of a new language.
How Much Time Do You Need to Become Travel Fluent?
For this version of the plan, I recommend allocating 90 to 120 minutes each day if your schedule allows it.
You don’t have to do it all at once; feel free to break it up. If you have 30 minutes on your commute or 20 minutes to twiddle your thumbs on your lunch break, fit it in there.
If you cannot make that much time each day, stretch the plan to 10 days or two weeks. More time can create more practice opportunities, but focused sessions and repetition matter more than chasing a fixed daily total.
What Tools Do You Need?
I’m with Benny in that I don’t particularly enjoy the process of learning a language, which is why I love using tools to make that process as quick and painless as possible.
You can assemble this toolkit with free and paid options. Check the current price and platform support before choosing an app or tutor:
- Anki: This flashcard system uses spaced repetition. Its official apps and pricing differ by platform.
- Forvo: Provides speaker recordings for many words and phrases. Check the language, region and contributor attached to each recording.
- Preply: A paid tutoring marketplace where you can arrange practice with a teacher.
- YouTube: A source of listening material. Verify who made a lesson before treating it as a language reference.
You will also need a reliable dictionary for your specific language and variety. Prefer a national-language institution, established learner's dictionary or source that provides examples and audio.
Okay, that’s your tool-kit taken care of. Let’s see what the next seven days are going to look like, shall we?
Day 1: Greetings, Numbers And Finding Your Phrases
Today is going to set you up for the next six days and give you the essential parts of the language you’ll need.
I’ve broken it down into three steps:
Step 1: Get Stuck Into The Language (15-20 minutes)
For the first part of today, go online and find this information:
- Numbers 0-100
- Greetings and pleasantries (Hello, please, thank you, etc.)
There are several places to find them. For example, an established course or dictionary may provide a checked list, while a video can demonstrate the sounds. Cross-check an anonymous phrase list before putting it into your cards.
You can also enter anything you struggle with into the Forvo tool and find out how it’s pronounced:
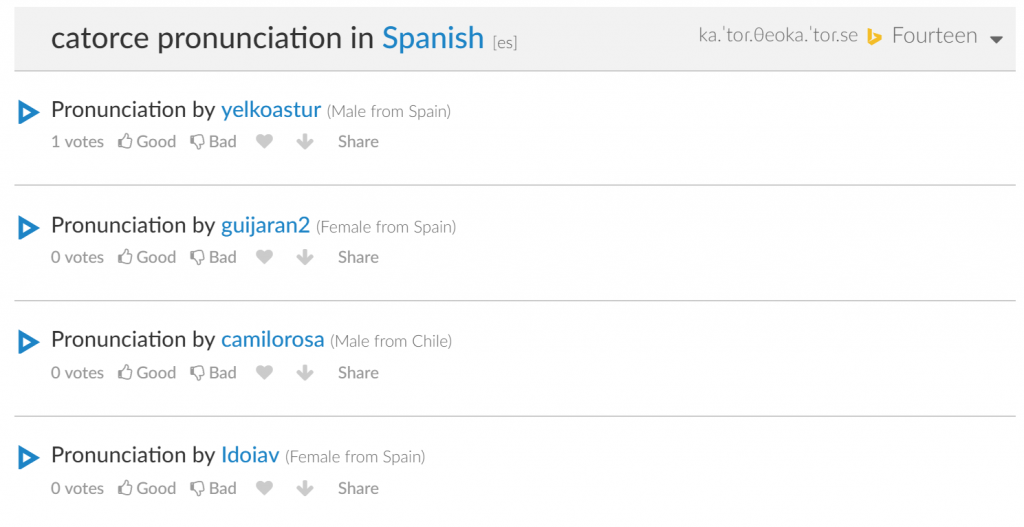
Once you have checked the forms and audio, add them to Anki. The official Anki manual explains how to add and edit cards.
During review, reveal the answer and rate how well you recalled it. Anki uses that response to schedule the card again.
By the end of the next seven days you’ll have a list for every day, similar to mine below (I last ran this with German):
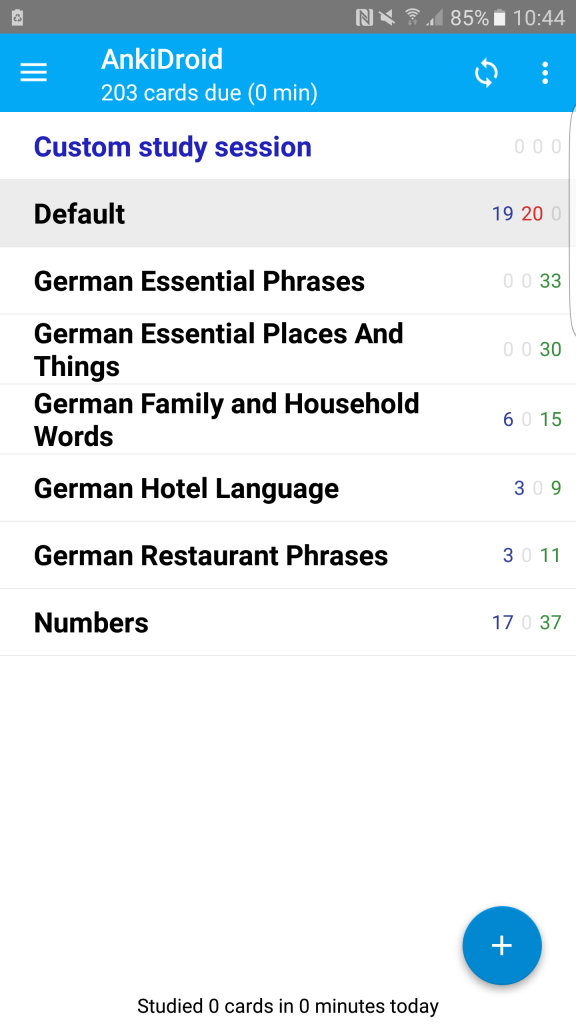
Numbers can help with money, bus routes, train platforms, times and the number of guests in a hotel booking.
Greetings also help you open an interaction politely before making a request.
If you’re stuck for what greetings you should learn, here’s where I’d suggest you start:
- Hello
- Good morning/afternoon/night
- How are you?
- Please
- Thank you
- Yes
- No
- Sorry
- The bill, please
- I don’t understand
Don’t worry if they don’t all stick right away because you’re going to come back to them later.
Step 2: Outline The Phrases You’ll Need (20-25 minutes)
In this step, you’re going to look at all the phrases you feel you’re going to need.
This video shows how Benny builds a personalised phrasebook from the situations he expects to discuss:
Take a look at your trip – or why you’re travelling – and think about the types of situations you’re going to encounter.
For example, I first used this technique when I was backpacking in Peru. So my survival situations looked like this:
Hostels
- Booking
- Checking in
- Checking out
Buses
- Finding the station
- Is it going to where I want to go?
- Which ticket do I need?
- How much does a ticket cost?
- How long does it take?
- Can you tell me when it’s my stop?
Restaurants
- Ordering food
- Paying
Supermarkets
- How much is this?
- Where is [item]?
Bars
- Ordering beer(s)
If I could get by with those, I could survive. Which, I did (just about). It also led to me going on Tinder dates and learning how to have conversations while giving me the confidence to take classes.
Go ahead and write all of the situations you’re going to need into a notebook or a Word document. You don’t need to write the translations just yet. This is where you’ll highlight the situations.
A pro tip here is also to underline the situations that are similar, like I’ve bolded the following:
- How much does a ticket cost?
- How much is an apple?
In Spanish, both questions can use the same opening:
- ¿Cuánto cuesta un billete?
- ¿Cuánto cuesta una manzana?
This will help you tie everything together in the days to come. Once you’ve got that in place, let’s head to the final step for today.
Step 3: Study What You Started With (Remaining Time)
Head back to Anki and see how much you remember from earlier.
It doesn’t matter if you don’t remember everything; you’ll be coming back to this each day. But work through the deck and do your best to remember them.
If you really struggle to remember any of them, try using mnemonics to etch them in your mind.
Day 2: Your Most Important Situation(s)
Start today off by reviewing your cards from yesterday.
Take 10 to 15 minutes to work through your greetings and numbers. See how much you remember, and refresh your memory on others.
The rest of today is going to be spent on putting together a list of phrases, and responses, to your two most important situations, which we’ll go through together next.
Learn Your Two Most Important Situations (Remainder)
When you made your list of situations there were likely one or two that really stood out to you. You may have rushed to write them down, or felt like you’d really struggle to get by without them.
For me it’s always public transport and ordering in a restaurant. I don’t like being lost or hungry (or both), so they’re of high importance.
So, it’s time to break them down from the list you made yesterday and explore the parts of the language you’re going to need to know.
What Are You Going To Need To Say?
If you’re in a restaurant, what are you going to need to say? Go through the process in English and look at the times you come into contact with someone:
- Ask for a table
- Ask for the menu
- Order a drink
- Order your food
- “Yeah, it’s nice…thank you”
- Order the bill
You can then start to translate the phrases you’ll need for those situations and learn what you need to say.
This takes some research on the internet. And, I don’t recommend you rely on Google Translate for this. Instead look for language-specific phrasebooks with English translations.
Once you find them you can start writing up your list of phrases. For example, in Spanish:
- “A table for four, please.” – Una mesa para cuatro, por favor.
- “Could you bring me the menu, please?” – ¿Me trae la carta, por favor?
- “Can we order?” – ¿Podemos pedir?
- “A beer, please.” – Una cerveza, por favor.
- “Could you bring me [dish], please?” – ¿Me trae [plato], por favor?
- “Everything is delicious, thank you.” – Todo está muy rico, gracias.
- “The bill, please.” – La cuenta, por favor.
A trap a lot of language learners fall into here – especially if you’re learning from a phrasebook – is you learn what you have to say, but not what they may say back to you.
So, you’re going to reverse this and put yourself in the shoes of the person you’re speaking to. In this case, the waiter.
You’ll never be able to predict their exact response. So because of that you should focus on learning the key words. Like the ones in bold here:
- “What would you like?” – ¿Qué desean?
- “Something to drink?” – ¿Algo para tomar?
- “What are you going to eat?” – ¿Qué van a comer?
- “Is everything okay?” – ¿Todo bien?
- “Yes, of course.” – Sí, claro.
- “Would you like dessert?” – ¿Quieren postre?
From those you can figure out what’s being asked based on the context.
Heck, with my intermediate Spanish I still use this method.
So, to wrap up this section:
Learn what you’re going to need to say
Learn what they’re going to say back to you
That way conversations don’t come as a surprise and you don’t feel panicked when someone asks you a follow-up question.
Days 3 and 4: Time to Start Listening
For days three and four, the schedule is the same for each.
You’re going to:
- Review each of the last few days (20-30 minutes): Go through Anki and review your flashcards. You should feel like you’re starting to get a grip of Day One and Two by the end of this.
- Tackle one new topic (30 minutes): As you saw in the last section, break down one of your topics and find the phrases and the responses to work through. Add them to Anki as you go for review later on.
- Listen to your language being spoken (10-15 minutes): I’m going to expand on this next so you know what to do.
- Review today’s Anki cards (remainder): Review what you learned in section two.
Now let’s look at what you can listen to and why you should be listening to it:
Listening to Your Language Being Spoken
So far you’ll have mostly heard your language through Forvo or YouTube examples. But today, you’re going to amp that up and do some intentional listening, where you hear the language spoken in context.
This allows you to pick out the sounds that you know, and listen to the general pronunciation of the language.
You do not need to understand everything after three or four days. Use the session to notice familiar sounds and phrases. Repeated listening can make the same material easier to follow, but spontaneous replies will still vary.
But, what should you be listening to? Well this is where YouTube really comes into its own. You can find:
- Podcasts: For language learners and natives
- Music: In just about every major language in the world
- Interviews: Find TV interviews in your target language
For example if you search “French Podcast” you’ll get a full page of results like this:
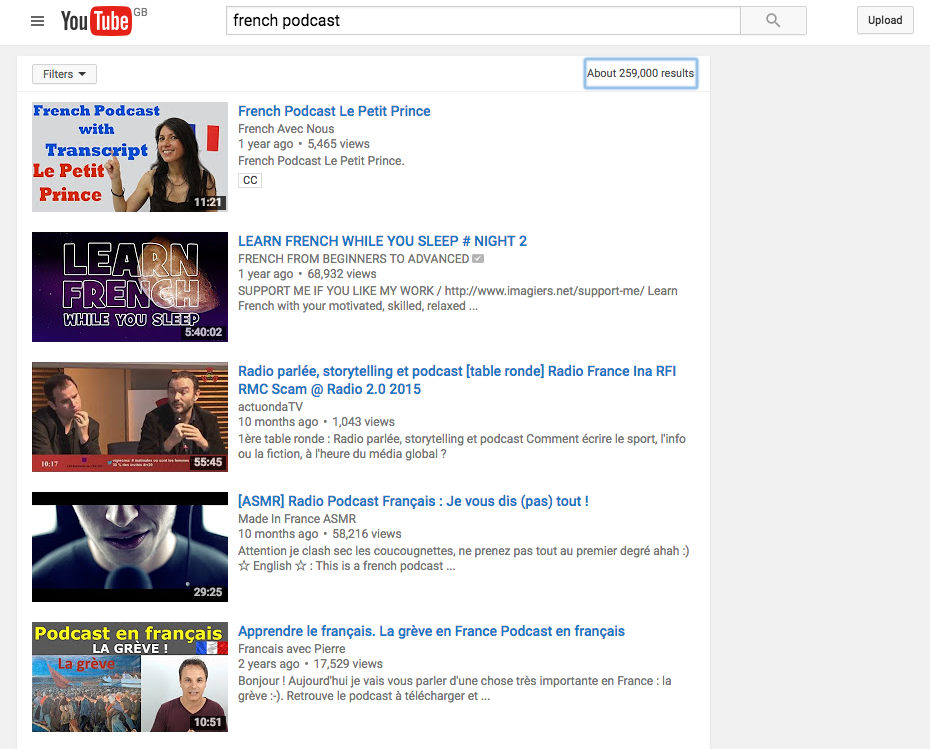
Video can let you see articulation and the surrounding situation as well as hear the words. Those cues may help you follow a short clip, although natural speech does not place a clear pause between every word.
If you work from a computer – and your boss lets you listen to music while you work – you can incorporate this stage into your workday, too. (I feel I owe Julieta Venegas and Juanes at least $500 in Spanish lessons).
The important thing is to listen attentively and compare what you hear with the checked phrases in your list. I felt that this step helped my later Spanish and German pronunciation.
Days 5 and 6: Time to Speak to Someone
By now you should be feeling pretty confident with what you learned on days one and two. And, days three and four are just about sinking in.
For the next two days you’ll follow a similar structure.
Start by reviewing the last few days. And, after that, work through any outstanding situations you have left. You can also continue to listen to music and podcasts if you like (foreign music is pretty cool, right?).
But the main change for these days is that you’re going to have a conversation with someone.
Don’t worry, it’s nothing major. Let me explain…
Get Talking To Someone
A practice conversation can reveal mistakes or missing phrases before you need to use the language on your trip.
You can also hear the responses you wrote earlier – and their variations – so you can pick out the words you know and improve your understanding.
And, from experience, I’ve found that when you say what you’ve learned, it sticks in your mind a heck of a lot longer.
If you have any friends or family that can speak the language you’re learning, collar them and get them to ask you a few simple questions based on your situations. (Pro tip: if they’re not able to do a real-time call or meet you in person, they can send WhatsApp or Facebook recorded messages).
But what if you don’t have anybody around you to talk to?
You can arrange a short session with a tutor, or find a language exchange partner who wants to practise your language. Agree on the goal and how you will divide the time before the call.
If this feels intimidating, explain what you are trying to achieve before the call. You can also send your scenario list in advance so your partner knows what to practise.
Okay, now you’ve got that in place, let’s look at the final day:
Day 7: The Finishing Touches
For the last day you’re going to work on anything that you struggled with over the previous six days.
Whether that is:
- Reviewing the phrases you struggle to remember
- Listening to YouTube videos and picking out the words you know
- Practising your phrases with someone on italki
I like to plan today to be the day that I fly, so I can use the language in practice. It’s also a good way to pass two hours on the plane by reviewing my flash cards and what I may need to say when I land.
If this is a few days ahead of when you travel, be sure to practise the flash cards and keep listening before you do fly. If you stop using a language when it’s this fresh in your mind, it’s easy to forget it.
If this is your first time using a new language, remember that it does not need to be perfect. The aim is to make a respectful effort, get your point across and ask for clarification when needed. Each person may respond differently, so do not treat one exchange as a test of an entire culture.
Wrapping It All Up…
Phew! If you made it here, well done. You’re either about to start this challenge or you’ve followed along and are now on your way to travel fluency.
Either way, you have taken a practical first step towards using a new language while travelling.
Here’s a summary of all the days:
- Day 1: Learn greetings and numbers. Then, map out all of the major situations you’re going to find yourself in.
- Day 2: Translate your two most important situations from English and look at the responses you’re likely to get. Be sure to focus on the keywords to listen out for.
- Days 3 and 4: Pick one more situation for each of these days. But, now is when we inject listening – podcasts/YouTube Videos/Music – into the mix.
- Days 5 and 6: Work on any outstanding situations, or your weak points. These days you’ll use to speak to someone and practise your phrases.
- Day 7: Review everything you’ve learned and tackle any points you struggled with.

Social